[TOC]
JUC之创建线程的几种方式
继承Thread类创建线程
通过继承Thread类创建一个线程类,新的 线程子类重写了Thread的run()方法,实现了用户业务代码的并发执行,具体如下:
1
2
3
4
5
6
7
8
9
10
11
12
13
14
15
16
17
18
19
20
21
22
23
24
25
26
| public class javaJUCstudy {
public static final int MAX_TURN = 5;
public static String getCurThreadName(){
return Thread.currentThread().getName();
}
static int threadId = 1;
public static void main(String[] args) {
Thread h;
for (int i = 0; i < 2; i++) {
h = new TestThread();
h.start();
}
System.out.println(getCurThreadName()+"运行结束");
}
}
class TestThread extends Thread{
public TestThread(){
super("TestThread:"+javaJUCstudy.threadId++);
}
public void run(){
for (int i = 0; i < javaJUCstudy.MAX_TURN; i++) {
System.out.println(getName()+",轮次:"+i);
}
System.out.println(getName()+"结束");
}
}
|
执行结果:
main运行结束
TestThread:2,轮次:0
TestThread:1,轮次:0
TestThread:2,轮次:1
TestThread:1,轮次:1
TestThread:2,轮次:2
TestThread:1,轮次:2
TestThread:2,轮次:3
TestThread:1,轮次:3
TestThread:1,轮次:4
TestThread:2,轮次:4
TestThread:2结束
TestThread:1结束
TestThread类的关键点是重写了Thread类的run()方法, 将需要并发执行的用户业务代码编写在继承的run()方法中。
实现Runnable接口创建线程目标类
通过继承Thread类并重写它的run()方法只是创建Java线程的一种方式。接下来要介绍的一种方式是通过实现现Runnable接口创建线程目标类,在这之前我们先来看看Thread的run方法。
1
2
3
4
5
6
7
8
9
10
11
12
| public class Thread implements Runnable {
......
private Runnable target;
public void run() {
if (target != null) {
target.run();
}
}
public Thread(Runnable target) {
init(null, target, "Thread-" + nextThreadNum(), 0);
}
}
|
在Thread类的run()方法中,如果target(执行目标)不为空,就 执行target属性的run()方法。而target属性是Thread类的一个实例属 性,并且target属性的类型为Runnable。
Thread类的target属性在什么情况下非空呢?Thread类有一系列 的构造器,其中有多个构造器可以为target属性赋值,这些构造器包 括如下两个:
    1. public Thread(Runnable target)
    1. public Thread(Runnable target,String name)
使用这两个构造器传入target执行目标实例(Runnable实例), 就可以直接通过Thread类的run()方法以默认方式实现。而我们可以通过创建一个类来实现Runnbale接口来创建Runnable实例。通过实现Runnable接口创建线程类的代码如下:
1
2
3
4
5
6
7
8
9
10
11
12
13
14
15
16
17
18
19
20
21
22
23
24
25
26
27
28
29
30
31
32
33
34
| package suan.JUC;
import java.util.concurrent.Callable;
import java.util.concurrent.FutureTask;
import java.util.concurrent.RunnableFuture;
public class RunnableTest {
public static final int MAX_TURN = 5;
public static String getCurThreadName(){
return Thread.currentThread().getName();
}
static int threadId = 1;
public static void main(String[] args) throws InterruptedException {
Thread h;
for (int i = 0; i < 2; i++) {
Runnable r = new TestRunnable();
h = new Thread(r,"TestThread:"+threadId++);
h.start();
}
Thread.sleep(1000);
System.out.println(getCurThreadName()+"结束");
}
}
class TestRunnable implements Runnable{
@Override
public void run() {
for (int i = 0; i < RunnableTest.MAX_TURN; i++) {
System.out.println(Thread.currentThread().getName()+",轮次:"+i);
}
System.out.println(Thread.currentThread().getName()+"结束");
}
}
|
执行结果:
TestThread:1,轮次:0
TestThread:2,轮次:0
TestThread:1,轮次:1
TestThread:2,轮次:1
TestThread:1,轮次:2
TestThread:2,轮次:2
TestThread:1,轮次:3
TestThread:2,轮次:3
TestThread:2,轮次:4
TestThread:1,轮次:4
TestThread:2结束
TestThread:1结束
main结束
实例中静态内部类RunTarget执行目标类,不再是继承Thread线程 类,而是实现Runnable接口,需要异步并发执行的代码逻辑被编写在 它的run()方法中。通过实现Runnable接口的方式创建的执行目标类,如果需要访问 线程的任何属性和方法,必须通过Thread.currentThread()获取当前 的线程对象,通过当前线程对象间接访问。
使用实现Runnable接口创建线程目标类的简便写法
因为Runnable是一个函数式接口,在接口实现时可以使用Lambda 表达式提供匿名实现,来简化我们的代码。改进后如下:
1
2
3
4
5
6
7
8
9
10
11
12
13
14
15
16
17
18
19
20
| public class RunnableTest {
public static final int MAX_TURN = 5;
public static String getCurThreadName(){
return Thread.currentThread().getName();
}
static int threadId = 1;
public static void main(String[] args) throws InterruptedException {
for (int i = 0; i < 2; i++) {
new Thread(()->{
for (int j = 0; j < RunnableTest.MAX_TURN; j++) {
System.out.println(Thread.currentThread().getName()+",轮次:"+j);
}
System.out.println(Thread.currentThread().getName()+"结束");
},"name"+threadId++).start();
}
Thread.sleep(1000);
System.out.println(getCurThreadName()+"结束");
}
}
|
执行结果如下:
name1,轮次:0
name2,轮次:0
name2,轮次:1
name2,轮次:2
name2,轮次:3
name2,轮次:4
name2结束
name1,轮次:1
name1,轮次:2
name1,轮次:3
name1,轮次:4
name1结束
main结束
使用Callable和FutureTask 创建线程
前面已经介绍了继承Thread类或者实现Runnable接口这两种方式 来创建线程类,但是这两种方式有一个共同的缺陷:不能获取异步执 行的结果。为了解决异步执行的结果问题,Java语言在1.5版本之后提供了一 种新的多线程创建方法:通过Callable接口和FutureTask类相结合创 建线程。
Callable接口
Callable接口位于java.util.concurrent包中,查看它的Java源 代码,如下:
1
2
3
4
5
| package java.util.concurrent;
@FunctionalInterface
public interface Callable<V> {
V call() throws Exception;
}
|
Callable接口是一个泛型接口,也是一个“函数式接口”。其唯 一的抽象方法call()有返回值,返回值的类型为Callable接口的泛型 形参类型。call()抽象方法还有一个Exception的异常声明,容许方法 的实现版本的内部异常直接抛出,并且可以不予捕获。但Callable接口不能像Runnable接口那样作为Thread线程实例的taiget使用,这就要引入RunnableFuture接口了。
RunnableFuture接口
RunnableFuture接口与 Runnable接口、Thread类紧密相关,RunnableFuture接口实现了两个目标:一是可以作为Thread线程 实例的target实例,二是可以获取异步执行的结果。
1
2
3
4
| package java.util.concurrent;
public interface RunnableFuture<V> extends Runnable, Future<V> {
void run();
}
|
RunnableFuture继承了Runnable接口,从 而保证了其实例可以作为Thread线程实例的target目标;同时, RunnableFuture通过继承Future接口,保证了可以获取未来的异步执 行结果。这里又需要引入Future接口了。
Future接口
Future接口至少提供了三大功能:
(1)能够取消异步执行中的任务。
(2)判断异步任务是否执行完成。
(3)获取异步任务完成后的执行结果。
Future接口的代码如下:
1
2
3
4
5
6
7
8
9
10
11
| package java.util.concurrent;
public interface Future<V> {
boolean cancel(boolean mayInterruptIfRunning);
boolean isCancelled();
boolean isDone();
V get() throws InterruptedException, ExecutionException;
V get(long timeout, TimeUnit unit)
throws InterruptedException, ExecutionException, TimeoutException;
}
|
FutureTask类
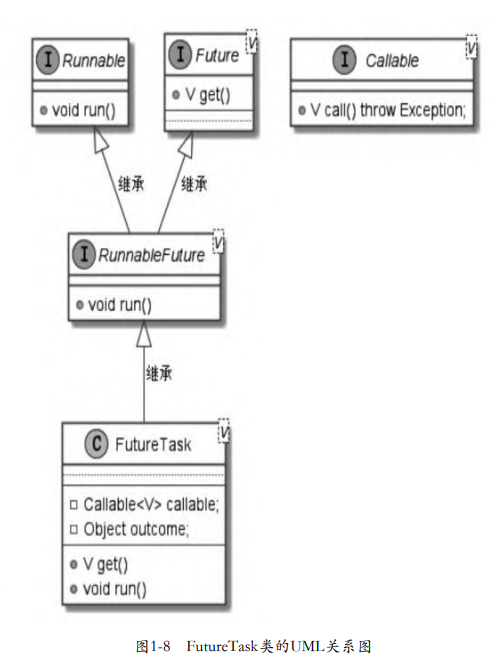
FutureTask类是Future接口的实现类,提供了对异步任务的操作 的具体实现。但是,FutureTask类不仅实现了Future接口,还实现了 Runnable接口,或者更加准确地说,FutureTask类实现了 RunnableFuture接口。
FutureTask实现了 RunnableFuture接口,而RunnableFuture接口继承了Runnable接口和 Future接口,所以FutureTask既能作为一个Runnable类型的target执 行目标直接被Thread执行,又能作为Future异步任务来获取Callable 的计算结果。
机构图如下:

使用Callable和FutureTask创建线程的具体步骤
通过FutureTask类和Callable接口的联合使用可以创建能够获取 异步执行结果的线程,具体步骤如下:
(1)创建一个Callable接口的实现类,并实现其call()方法,编 写好异步执行的具体逻辑,可以有返回值。
(2)使用Callable实现类的实例构造一个FutureTask实例。
(3)使用FutureTask实例作为Thread构造器的target入参,构造 新的Thread线程实例。
(4)调用Thread实例的start()方法启动新线程,启动新线程的 run()方法并发执行。其内部的执行过程为:启动Thread实例的run() 方法并发执行后,会执行FutureTask实例的run()方法,最终会并发执 行Callable实现类的call()方法。
(5)调用FutureTask对象的get()方法阻塞性地获得并发线程的 执行结果。
代码如下:
1
2
3
4
5
6
7
8
9
10
11
12
13
14
15
16
17
18
19
20
21
22
23
24
25
26
27
28
29
30
31
32
33
34
35
36
37
38
39
40
41
42
43
44
45
46
47
| package suan.JUC;
import java.util.concurrent.Callable;
import java.util.concurrent.ExecutionException;
import java.util.concurrent.FutureTask;
public class FutureTaskTest {
public static final int MAX_TURN = 5;
public static final int COMPUTE_TIMES = 100000000;
public static String getCurThreadName(){
return Thread.currentThread().getName();
}
public static void main(String[] args) throws InterruptedException {
ReturnTask task = new ReturnTask();
FutureTask<Long> futureTask = new FutureTask<>(task);
Thread thread = new Thread(futureTask,"有返回值的异步线程");
thread.start();
Thread.sleep(1000);
System.out.println(getCurThreadName()+"等一会");
for (int i = 0; i < COMPUTE_TIMES/2; i++) {
int j = i * 10000;
}
System.out.println(getCurThreadName()+"获取异步执行的结果");
try {
System.out.println(thread.getName()+"线程占用时间"+futureTask.get());
} catch (ExecutionException e) {
e.printStackTrace();
}
System.out.println("运行结束");
}
}
class ReturnTask implements Callable<Long> {
@Override
public Long call() throws Exception {
long startTime = System.currentTimeMillis();
System.out.println(Thread.currentThread().getName()+"线程开始运行");
Thread.sleep(1000);
for (int i = 0; i < FutureTaskTest.COMPUTE_TIMES; i++) {
int j = i * 10000;
}
long useTime = System.currentTimeMillis() - startTime;
System.out.println(Thread.currentThread().getName()+"线程运行结束");
return useTime;
}
}
|
运行结果如下:
有返回值的异步线程线程开始运行
main等一会
有返回值的异步线程线程运行结束
main获取异步执行的结果
有返回值的异步线程线程占用时间1010
运行结束
通过线程池创建线程
前面的示例中,所创建的Thread实例在执行完成之后都销毁了, 这些线程实例都是不可复用的。实际上创建一个线程实例在时间成 本、资源耗费上都很高,在高并发的场景中,断然不 能频繁进行线程实例的创建与销毁,而是需要对已经创建好的线程实 例进行复用,这就涉及线程池的技术。Java中提供了一个静态工厂来 创建不同的线程池,该静态工厂为Executors工厂类。
向ExecutorService线程池提交异步执行target目标任务的常用方法有:
- 执行一个 Runnable类型的target执行目标实例,无返回 。
void execute(Runnable command);
- 提交一个 Callable类型的target执行目标实例, 返回一个 Future异步任务实例
Future submit(Callable task);
- 提交一个 Runnable类型的target执行目标实例, 返回一个 Future异步任务实例
Future submit(Runnable task);
代码实例:
1
2
3
4
5
6
7
8
9
10
11
12
13
14
15
16
17
18
19
20
21
22
23
24
25
26
27
28
29
30
31
32
33
34
35
36
37
38
39
40
41
42
43
44
45
46
47
48
49
50
51
52
53
54
55
56
57
58
59
60
61
62
| package suan.JUC;
import java.util.concurrent.*;
public class ExecutorsTest {
public static final int MAX_TURN = 5;
public static final int COMPUTE_TIMES = 100000000;
private static ExecutorService pool = Executors.newFixedThreadPool(3);
public static void main(String[] args) throws ExecutionException, InterruptedException {
pool.execute(new demoThread());
pool.execute(()->{
for (int i = 0; i < MAX_TURN; i++) {
System.out.println(Thread.currentThread().getName()+", 轮次: "+i);
try {
Thread.sleep(10);
} catch (InterruptedException e) {
e.printStackTrace();
}
}
});
Future<Long> submit = pool.submit(new ReturnTaskTest());
Long result = (Long)submit.get();
System.out.println("异步执行的结果:"+result);
Thread.sleep(5000);
System.out.println(Thread.currentThread().getName()+"结束");
}
}
class demoThread implements Runnable{
@Override
public void run() {
for (int i = 0; i < ExecutorsTest.MAX_TURN; i++) {
System.out.println(Thread.currentThread().getName()+", 轮次: "+ i);
try {
Thread.sleep(10);
} catch (InterruptedException e) {
e.printStackTrace();
}
}
}
}
class ReturnTaskTest implements Callable<Long> {
@Override
public Long call() throws Exception {
long startTime = System.currentTimeMillis();
System.out.println(Thread.currentThread().getName()+"线程开始运行");
Thread.sleep(1000);
for (int i = 0; i < ExecutorsTest.MAX_TURN; i++) {
System.out.println(Thread.currentThread().getName()+", 轮次: "+i);
try {
Thread.sleep(10);
} catch (InterruptedException e) {
e.printStackTrace();
}
}
long useTime = System.currentTimeMillis() - startTime;
System.out.println(Thread.currentThread().getName()+"线程运行结束");
return useTime;
}
}
|
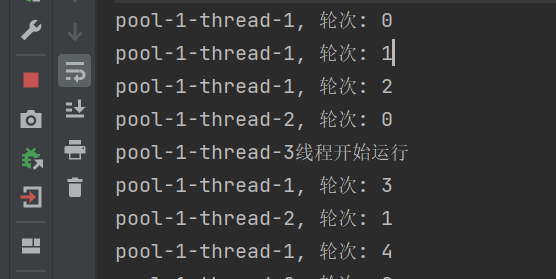
执行结果:
pool-1-thread-1, 轮次: 0
pool-1-thread-1, 轮次: 1
pool-1-thread-1, 轮次: 2
pool-1-thread-2, 轮次: 0
pool-1-thread-3线程开始运行
pool-1-thread-1, 轮次: 3
pool-1-thread-2, 轮次: 1
pool-1-thread-1, 轮次: 4
pool-1-thread-2, 轮次: 2
pool-1-thread-2, 轮次: 3
pool-1-thread-2, 轮次: 4
pool-1-thread-3, 轮次: 0
pool-1-thread-3, 轮次: 1
pool-1-thread-3, 轮次: 2
pool-1-thread-3, 轮次: 3
pool-1-thread-3, 轮次: 4
pool-1-thread-3线程运行结束
异步执行的结果:1086
main结束
此时虽然main方法的线程结束了,但是线程池中的线程还没有结束,程序还没有停止。


